Blog
Stay updated with our new news
Why Pay for a Container Registry? Build Your Own in Minutes with JPaas

Introduction
JPaas empowers you to take full control of your container images without relying on public registries or costly managed services.
If you work with containers, you’ve faced the big question: where do you store your images?
Do you rely on a public registry, constantly watching your pull limits during builds and wrestling with the security uncertainties of using public images?
Or do you commit to a pricey managed service that can quickly strain your budget?
It often feels like a choice between “limited” and “expensive.”
For modern development and DevOps teams, control, security, and cost-efficiency aren’t just nice-to-haves, they’re essential.
You need powerful features like vulnerability scanning, detailed auditing, and flexible authentication, but without the enterprise-level price tag.
This is where self-hosting a powerful, open-source registry becomes the perfect solution. You get all the control and features of a premium private registry, but on a flexible, pay-per-use model that you manage.
In this guide, we’ll show you exactly how to deploy your own secure and cost-effective private container registry on JPaas in just a few simple steps.
If you work with containers, you’ve faced the big question: where do you store your images?
Why Harbor?
There are several open-source registries available, so why focus on Harbor?
The answer is simple: Harbor is an enterprise-grade, CNCF (Cloud Native Computing Foundation) graduated project that delivers a huge amount of functionality right out of the box, Here’s a quick look at what makes it so powerful:
1. Cloud-Native Ready
It’s more than just a Docker registry. Harbor natively stores both container images and Helm charts, making it a true artifact hub for your cloud-native applications.
2. Advanced Security
- Vulnerability Scanning: Automatically scan images for security threats and create policies to block vulnerable images from deployment.
- Image Signing: Use Docker Content Trust and Notary to sign images, guaranteeing authenticity and preventing unsigned images from running.
3. Powerful Administration
- Intuitive Web Portal: Manage all projects, users, and repositories through a clean, easy-to-use interface.
- Role-Based Access Control (RBAC): Organize your work into projects and assign user permissions to control access.
- Enterprise Authentication: Integrate with LDAP/AD or OIDC for single sign-on (SSO).
4. Automation and Integration
- Policy-Based Replication: Sync your images across multiple registries or regions for high availability.
- Full Auditing & API: Track every action and automate tasks via a comprehensive RESTful API—perfect for CI/CD pipelines.
- Garbage Collection: Remove old, unused image layers to free up valuable storage space.
Prerequisites
To get started, you’ll need:
- A JPaas Account – Sign up at Libyan Spider.
- Docker Installed Locally – Download Docker here.
- Basic Docker Knowledge – Be familiar with commands like
docker pull,tag, andpush.
Step-by-Step Guide
Step 1: Create a Custom Docker CE Environment
- Log in to the JPaas dashboard. If you’re new, start a 14-day free trial.
- Click the “New Environment” button in the top left corner.
- In the topology wizard, select the “Custom” tab. Here you can find more advanced options.
- Find and select “Docker CE” to have JPaas automatically deploy a clean Docker server for you.

- On the right side, make sure to enable the SSL toggle. JPaas provides a Shared Load Balancer that will handle SSL termination for us, which simplifies our Harbor configuration later.
- Give your environment a name (e.g., harbor-registry) and click “Create”.

Step 2: Download and Extract the Harbor Installer
Now we need to connect to our newly created Docker node to download and prepare the Harbor files.
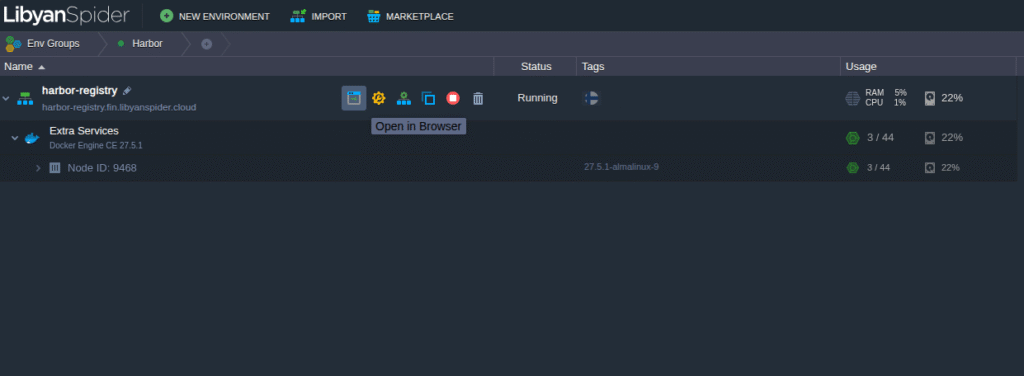
- From the JPaas dashboard, find your harbor-registry environment and click the “Web SSH” button to open a command-line terminal directly in your browser.

- Once connected, run the following command to download the Harbor offline installer.
- Next, extract the files from the archive you just downloaded:
Step 3: Prepare the Harbor Configuration File
Before we can run the installer, we need to create and edit a configuration file.
- Navigate into the new harbor directory: cd harbor
- Copy the configuration template to create your own harbor.yml file:
Step 4: Editing the harbor.yml File
This is where we tell Harbor its public address and set up our credentials.
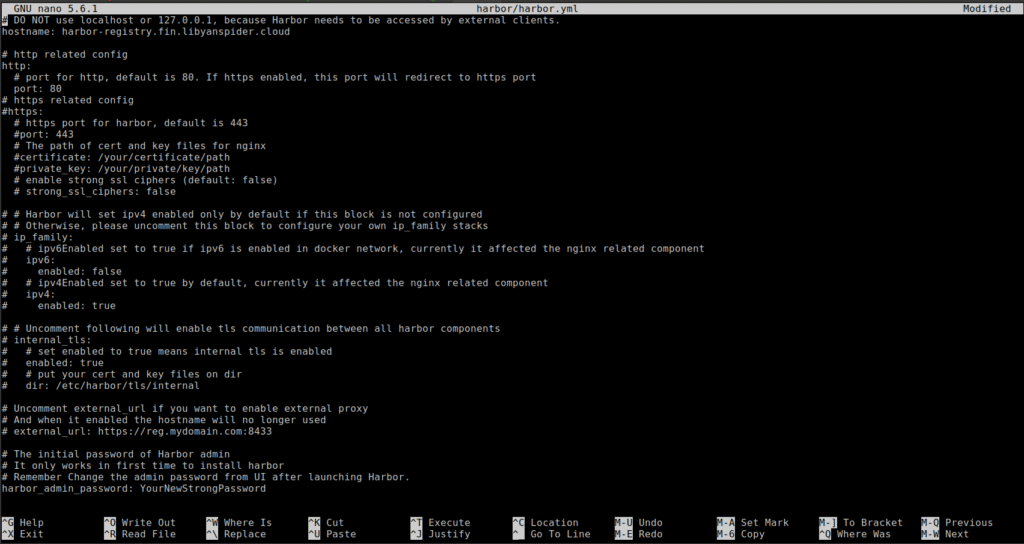
- Open the configuration file for editing: nano harbor.yml
- Make the following three changes inside the file.
A. Set Your Hostname
Find the hostname: line and replace the default value with the URL from your JPaas dashboard (e.g., harbor-registry.libyanspider.cloud).
hostname: harbor-registry.libyanspider.cloudB. Set Your Admin Password
Find the harbor_admin_password: line and change the default password to a new, strong password.
harbor_admin_password: YourNewStrongPasswordC. Disable Harbor’s Internal HTTPS
Because the JPaas Load Balancer handles HTTPS, we need to disable it internally. Find the https section and add a # at the beginning of every line to comment it out.
# https related config#https:
# # https port for harbor, default is 443
# port: 443
# # The path of cert and key files for nginx
# certificate: /your/certificate/path
# private_key: /your/private/key/path
Once done, save the file and exit by pressing Ctrl+X, followed by Y, and then Enter.

Step 5: Run the Installer and Access Harbor
Now, let’s run the installation scripts.
- Back in your terminal, run the prepare script to generate the configs.
- Next, run the main install script. This will take several minutes to complete.

Step 6: Log In to Your Harbor Dashboard
Once the installation is complete, your private registry is live.
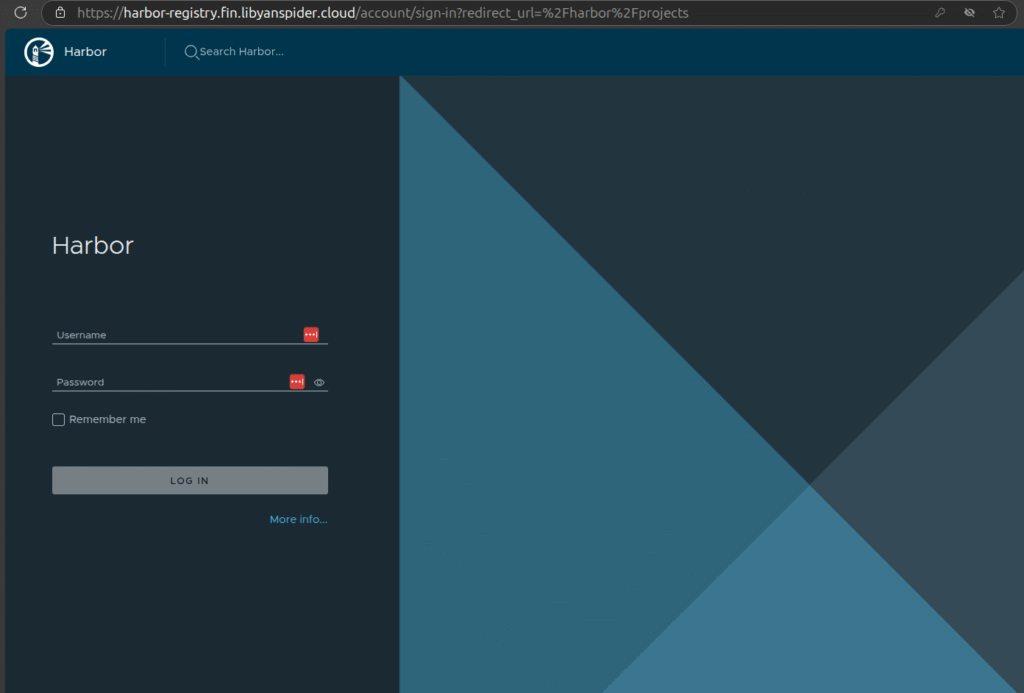
- Open your web browser and navigate to your JPaas environment URL (e.g., https://harbor-registry.libyanspider.cloud).

- Log in with the username admin and the password you configured.

Congratulations! You are now logged into the dashboard of your very own private, secure container registry.
Conclusion
And there you have it! You’ve successfully deployed a powerful, enterprise-grade private container registry. In just a few steps, you’ve unlocked a secure, private hub for your container images, complete with advanced features like vulnerability scanning and role-based access control.
By combining the open-source power of Harbor with the flexibility and cost-effectiveness of the JPaas platform, you’ve built a solution that gives you complete control over your software assets without the high costs of managed services.
What’s Next?
Your new Harbor registry is ready to be integrated into your development workflow. You can start creating new projects, setting up user accounts, and configuring it as the target for your CI/CD pipelines.
Useful Links
- To continue your journey, here are a few resources that you might find helpful:
- Learn more about JPaas: Discover all the features of the platform on the official JPaas page.
- Harbor Project on GitHub: Explore the source code and official documentation on the Harbor GitHub repository.
- About the CNCF: Learn more about the Cloud Native Computing Foundation at their official website.
- Deploying from a Private Registry: Read the official documentation on how to deploy a container from your new private registry.
- Alternative SSL Setup: For a guide on deploying Harbor with a self-signed certificate, this Medium article provides a detailed walkthrough.
Share:
More Articles

Stop Using Traditional VPNs: Why Cloudflare Tunnel Is the F…

Data Privacy Day: As Libya Goes Digital, Trust Becomes the…

Beyond Business: ls.gives is Our Commitment to a Better Com…


Leave a Reply